How to Manage Approvals: Guides & Videos
Welcome to the Approval Process How-To Guides and Videos page!
This page is designed to help you navigate and manage approvals in Weissr Capex Management with ease. Whether you're approving requests, tracking their progress, or understanding how decision-making works, our step-by-step guides and video tutorials will provide you with the tools and confidence to get things done.
Here’s what you’ll find on this page:
Step-by-Step Guides: Follow detailed instructions to learn how to manage approval routes, make decisions, and view request histories.
Video Tutorials: Watch clear and concise videos that demonstrate how to complete tasks related to approvals.
Practical Tips: Get helpful insights to streamline your work and stay on top of the approval process.
No matter your experience level, these resources are here to support you in mastering the approval workflows. Select a guide or video below to get started!
How to Approve a Step
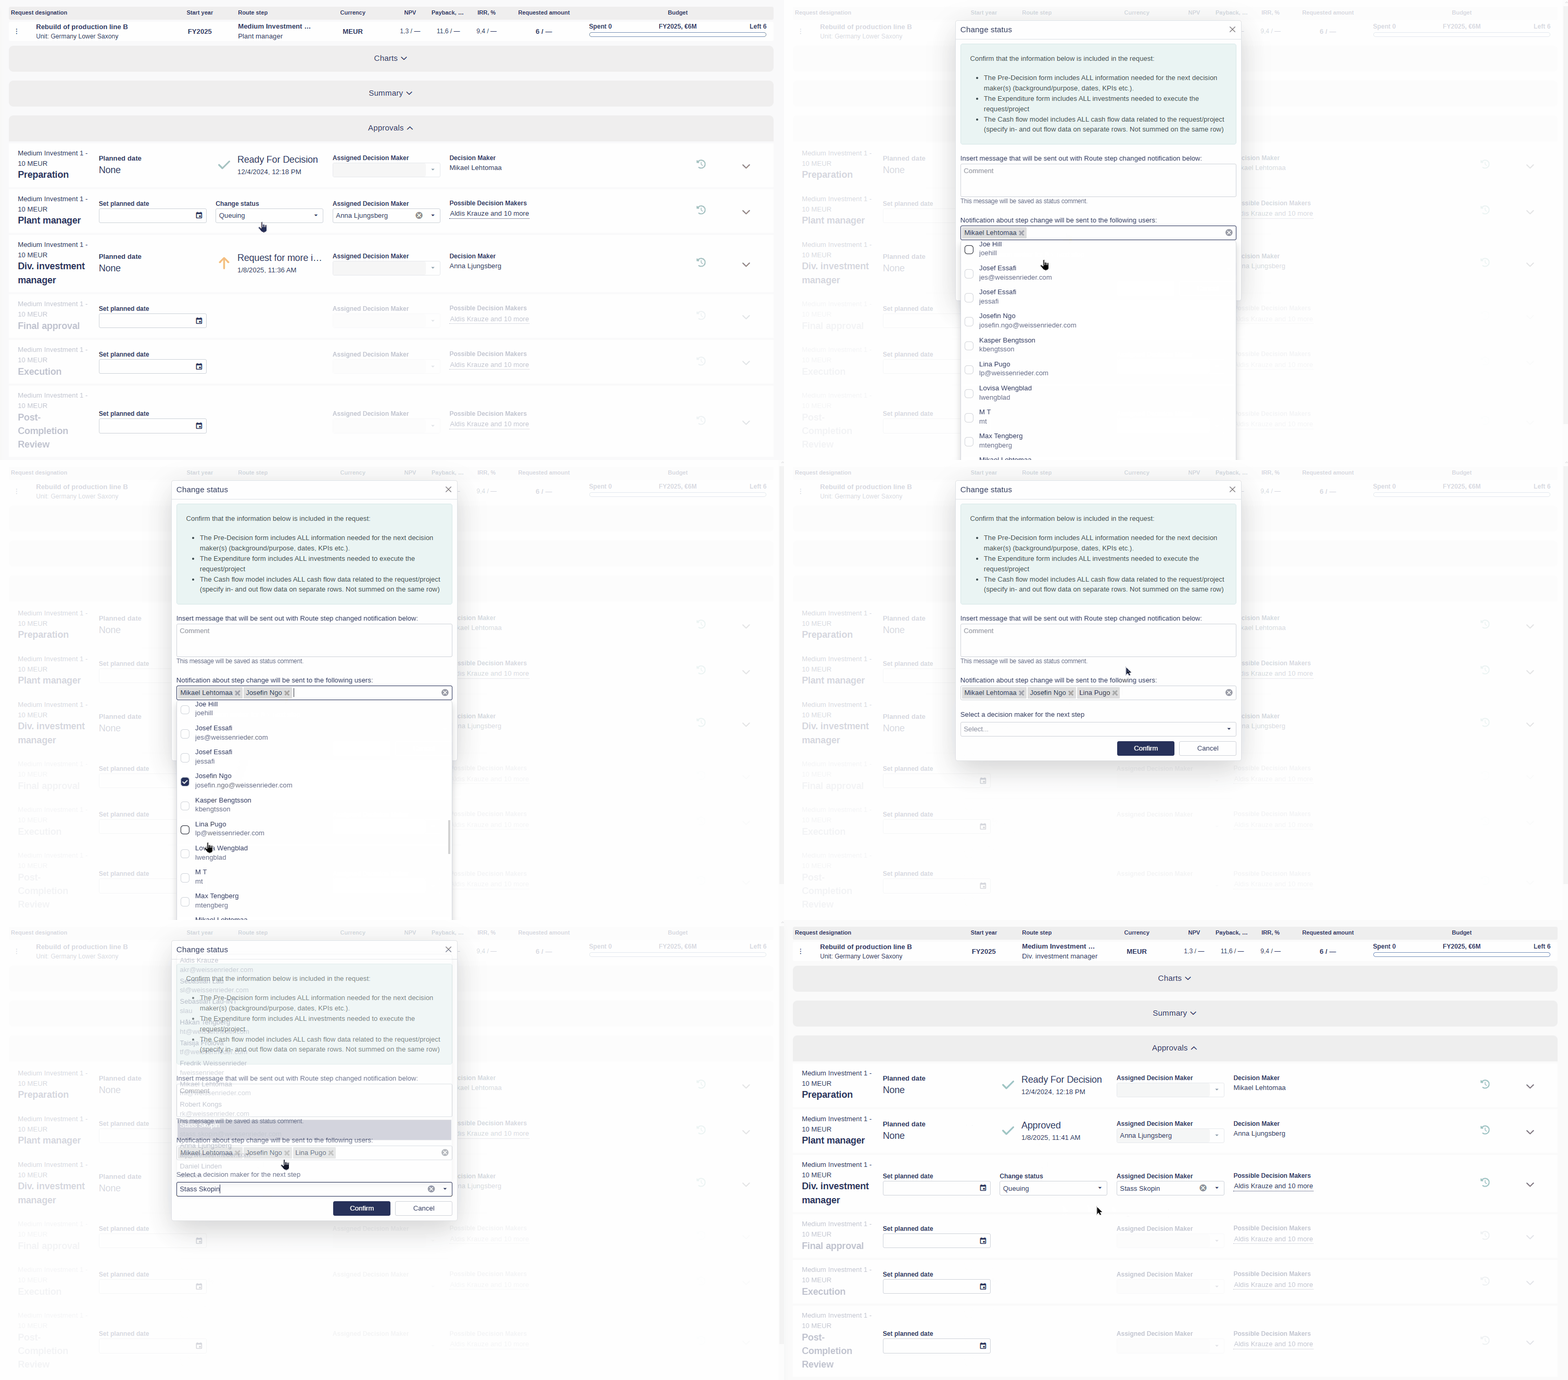
Approving steps in Weissr Capex Management's approval workflow is straightforward. Follow the steps below to approve or reject a request, assign the next decision-maker, and ensure smooth progress through the approval workflow.
Locate the Request
Open any Requests list and find the request you want to take a decision for.
Click on the request to open it.
Access the Approvals Tab
Navigate to the Approvals tab within the request.
(Note): The Approvals tab will only appear if a Decision Route has been selected in the form, and it might be named differently in your application.
Change the Status
Locate the relevant approval step.
In the Change Status column, click the dropdown menu and select the appropriate option (e.g., Approve, Reject).
Assign the Next Decision-Maker
In the confirmation pop-up, choose the user responsible for the next step in the approval route.
(Tip): The assigned decision-maker will automatically receive a notification about their responsibility.
Notify Other Users
Still in the confirmation pop-up, manage the list of users who will be notified about your decision.
Add or remove users as needed to ensure relevant stakeholders are informed.
Finalize the Decision
Click Confirm in the pop-up to complete the status change, assign the next decision-maker, and notify selected users.
If you encounter issues where no decision-makers are available for a step, refer to the Troubleshooting Decision-Maker Availability Guide for detailed instructions on identifying and resolving the problem. This guide covers common causes, such as missing permissions, decision rule violations, or incomplete data, and provides steps to address them effectively.
How to Add and Remove Notification Recipients When Approving
You can easily customize who receives notifications about a decision you’re making. Follow these steps to include or exclude specific recipients:
Open the Request
Locate the request in the Requests list and click on it to open.
Navigate to the Approvals tab.
Change the Status
In the Change Status column of the relevant approval step, click the dropdown menu and select the appropriate option (e.g., Approve, Reject).
Customize Notification Recipients
In the confirmation pop-up, a list of pre-defined users who will be notified is displayed.
Perform the following actions:
Add a Recipient: Select a person from the list to include them in the notification.
Remove a Recipient: De-select a person to exclude them from the notification.
Remove all Recipients: Click on the x to the right in the notification recipient’s field
Finalize the Decision
After customizing the notification list, click Confirm to complete the status change and notify the selected recipients.
How to Make a New Request Visible to Others
By default, a new request in Weissr Capex Management is only visible to its original creator. To share it with others, follow these steps:
Locate Your Request
Go to the Requests list and find the request you want to make visible.
Click on the request to open it.
Ensure a Decision Route is Selected
Navigate to the Approvals tab within the request. (Note: The Approvals tab will only appear after a Decision Route has been selected.)
Change the Request Status
In the Change Status column, update the request’s status. (Note: The status names depend on your organization’s naming conventions)
In Progress: Make the request visible to other users with the appropriate permissions before making a decision.
Ready for Decision: Prepares the request for the decision-making process by moving it to the next step in the approval route.
Not Started/Draft: Keeps the request private and visible only to you.


