Approval Routes - Permissions
Approval permissions in Weissr define who can approve or reject requests based on their role and the configured approval logic. These permissions are tied to organizational structure access, meaning a user can only approve requests they have at least read access to.
Administrators can assign approval permissions to either individual users or user groups, with user groups being the recommended approach for easier maintenance.
Approval permissions for user groups
This is often the recommended approach due to better visibility and easier maintenance for the administrator.
User groups are best used when approval is based on a role rather than a specific person. For example, if every production unit needs someone in the “Unit Director” role to approve, then you can create a user group for Unit Directors and assign approval to that group.
Why use user groups?
Easier to manage as users come and go.
Multiple people can share the same role across organizational units.
Ensures role-based approvals without depending on individual user assignment.
Example use case:
You have 3 production units (Paris, Riga, and Berlin). Each unit requires a local finance approver. Instead of assigning permissions to each individual, create a group called "Finance Approvers" and apply it at the step level. Each member will only be able to approve requests within their accessible units (based on their node permissions).
Approval permissions for individual users
Used when approval depends on personal criteria.
Sometimes, a request must be approved by a particular individual, for instance, the Project Manager or someone manually selected in the form. The administrator sets up approval rights accordingly, meaning that the manager is assigned dynamically when a request is created by a specific user.
When to use individual user permissions
The request must always be approved by a specific person due to personal responsibility or domain knowledge.
The user is selected via a user property (e.g., “project owner”).
If there are multiple potential decision-makers per step, administrators can bulk import user-specific permissions.
Downsides
Needs manual updates whenever someone joins, leaves, or changes role.
Not scalable for large teams or organizations.
Example use case:
A cost center requires that only the Department Head approves all Capex above 1 million USD. An approval permission is created specifically for that person.
Requirements for approval
Approval permissions specify which users can make decisions. However, this permission alone does not grant access to view all requests within the node. It only provides the ability to change the state of a request as part of the approval workflow. For a user to approve a request, they must meet the following conditions:
Approval Permission (defined in the organizational structure)
Access to the Request via one of the following:
Project (CM) Permission (at least Read access)
Request Creation Permission (as the request owner)
Being assigned in a user property (e.g., project manager) with Read or Edit access.
Approval Permission for the Route Step, as described above, via:
User Group Approval Permission (recommended)
Individual User Approval Permission
Keep in mind that some steps in the approval route may require specific properties to be filled, unrelated to permissions but essential for the process.
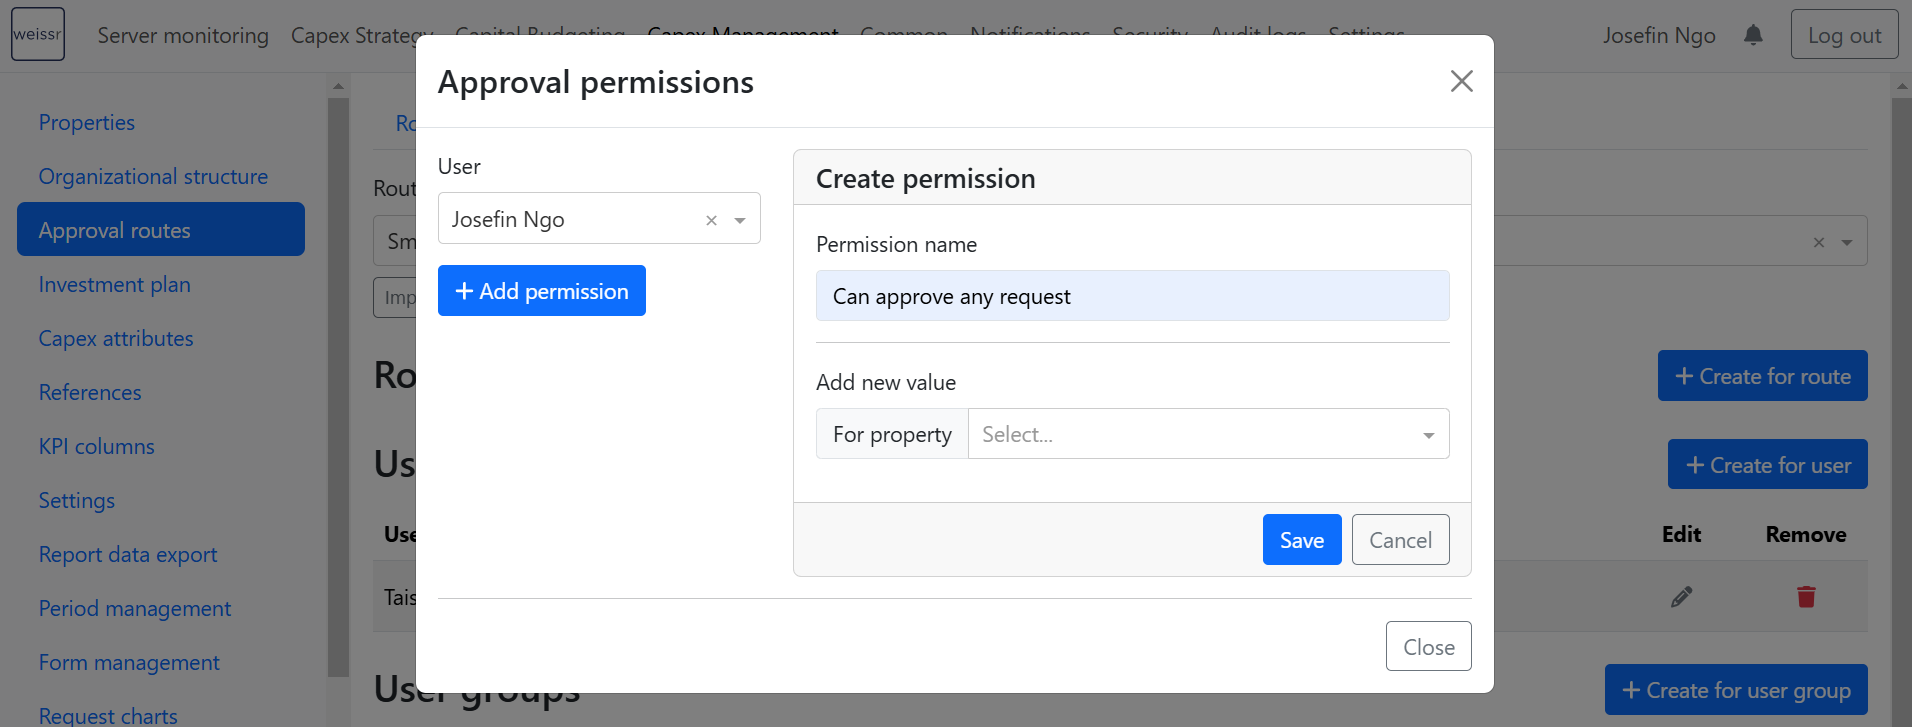
Approve any request for a specific route step
To add a decision-maker that can approve any request in the specified route step, follow these steps:
Navigate to Capex Management → Approval routes → Permissions.
Select the desired route and step.
Click on “Create for user” or “Create for user group”.
Select the desired user or user group.
Click on “Add permission”.
Enter a permission name that describes its purpose.
Click “Save”.
If a user does not have approval permission for a step, they cannot move the decision forward. In this case:
Change status: Disabled
Possible decision-makers list: Does not include the current user
Info message: Informs the user that they cannot make a decision on the current step (shown on hover)

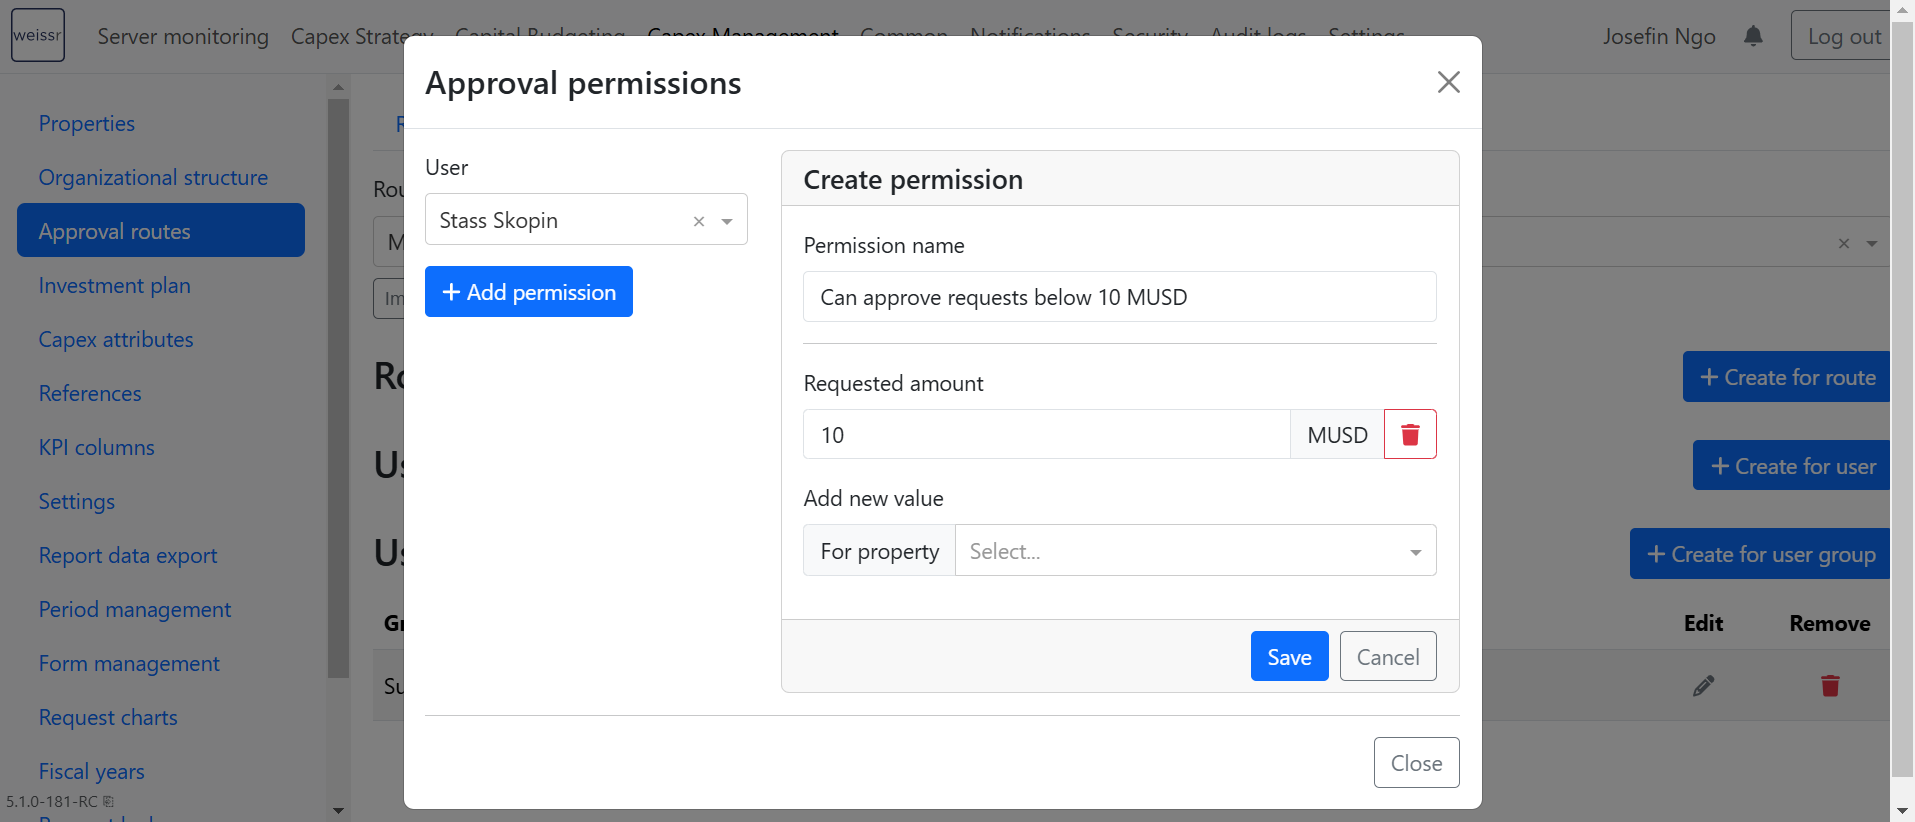
Approving requests based on specific values
Within a single step, you can define one or more conditions based on any type of property - for example, production unit, division, or project type.
Example: If a request’s amount exceeds a specified value, the decision-maker cannot approve it. Only users with special approval rights can approve Capex requests above 10 million USD.
Steps to configure approval based on a money threshold (as an example of a property):
Navigate to Capex Management → Approval routes → Permissions.
Select desired route and step.
Click on “Create for user” or “Create for user group”.
Select desired user or user group.
Click on “Add permission”.
Enter a permission name that describes its purpose.
Select a property in “Add new value” dropdown (e.g. Requested amount).
Enter maximum permitted amount in MUSD.
Click “Save”.
The property will be disabled for selection if it is used in route permissions (conditions).
If a user has approval permission based on a property value, but the request does not meet the criteria, they cannot move the decision forward. In this case:
Change status: Disabled
Possible decision-makers list: Does not include the current user
Info message: Displays a description of the unmet criteria (shown on hover)
Combining multiple conditions
Weissr allows you to combine different property types - e.g., Production Unit + Business Division. You can even target the same property with multiple values (e.g., Paris OR Riga). This flexibility helps you fine-tune approval logic per organizational setup.
Within a permission, multiple conditions use AND logic (i.e., all must be true).
Between permissions, OR logic applies (i.e., at least one must be true).
Important behavior notes:
If two values of the same property are added (e.g., two production units), Weissr treats them with OR logic.
If two different properties are added in the same permission, AND logic is applied.
If multiple permissions are defined for a user or group, OR logic applies between them.
Approval criteria based on any money-type property
It is possible to define approval criteria for entire routes, meaning a request must meet all criteria before approval. Route-level criteria simplify configuration and maintenance, and are used to limit the approval of steps in the whole route based on any money-type property. For example, if a requested amount criterion is set at the route level, it will be applied to every step in the route. This ensures that no decision-maker can approve the request unless the request meets the specified amount requirement. Setting approval criteria at the route level helps streamline the approval process and ensures consistent decision-making. However, the criteria should be carefully chosen to reflect the requirements of the project accurately.
Only money-type properties can be used for route-level approval criteria. Not to confuse with step-specific criteria, that can include other conditions beyond money-type properties.
Example use case:
A company wants to ensure that any Capex request over 5 million USD follows a stricter approval process. To avoid configuring the same condition on every individual step, the administrator applies a route-level condition. This ensures that the approval threshold is consistently enforced across all steps in the route. The condition restricts approval based on the specified monetary value, independently of user-specific permissions. (However, route permissions itself will not allow any user to approve steps in the route. Decision-makers must still meet any additional approval permissions configured for the request, such as step-level or organizational access requirements.)
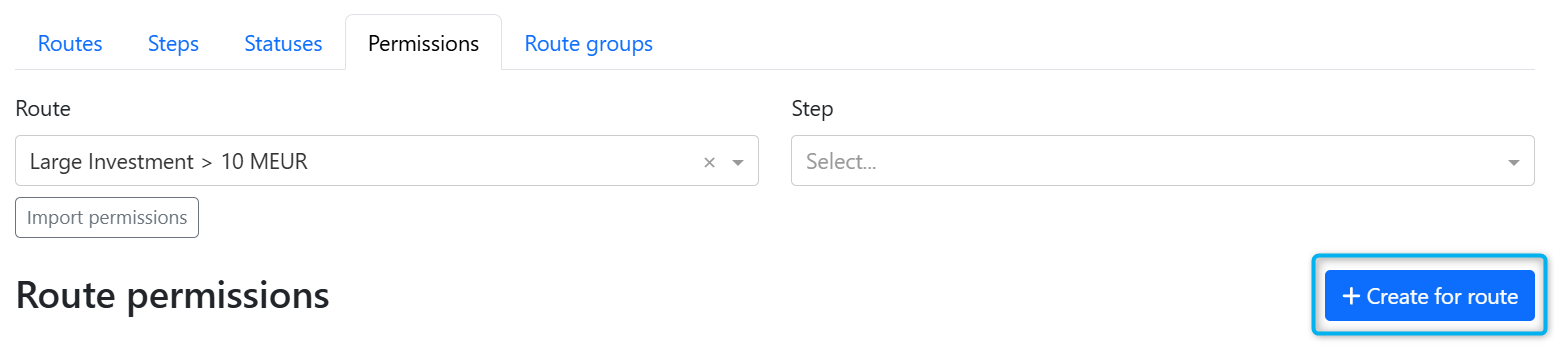
Steps to configure approval criteria based on any money-type property:
Navigate to Administration → Capex Management → Approval routes → Permissions.
Select a route.
Click on “Create for route”.
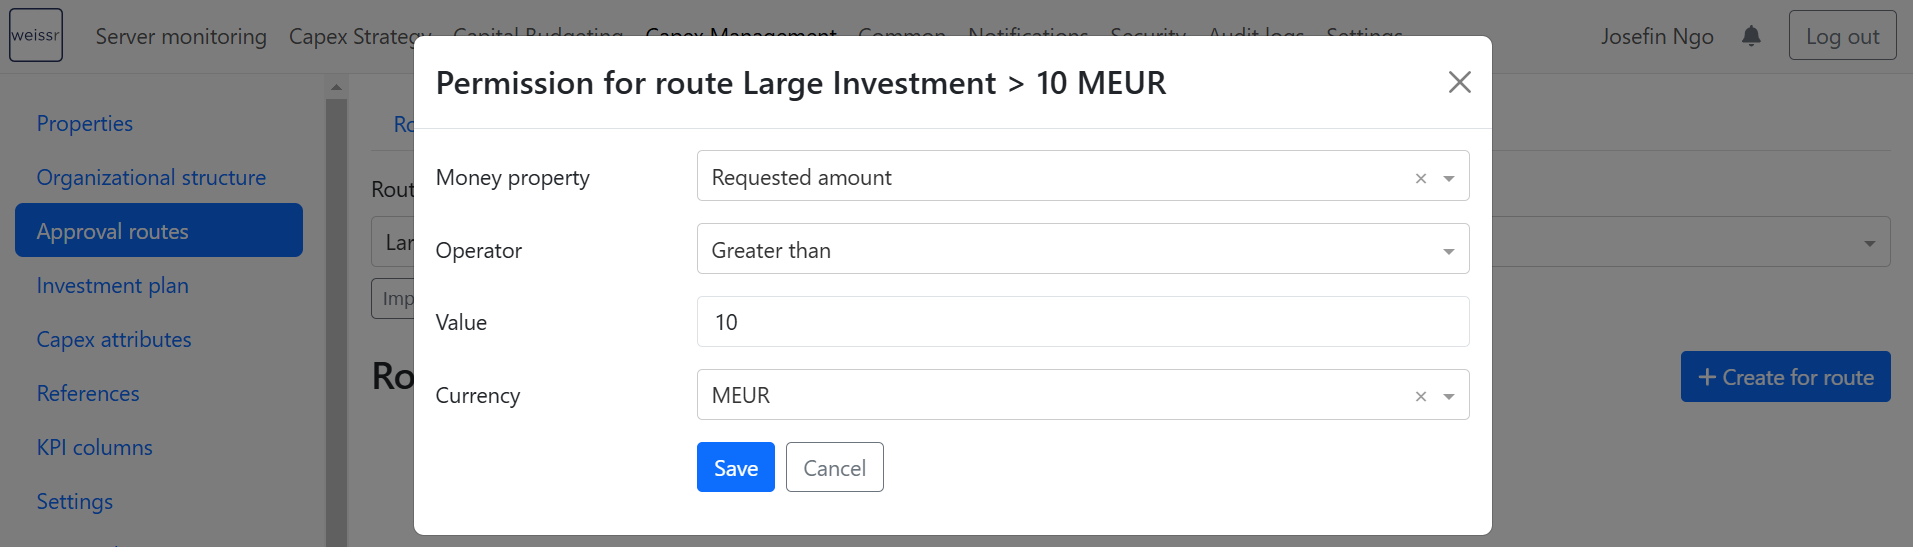
Fill in all necessary data (all fields are mandatory).
Multiple route conditions can be configured per route.
Money property: Dynamic/static money properties are available in Weissr. (A property will be disabled for selection if it is used in route step approval permissions for a user or user group.)
Operator: Equal, Not equal, Less than, Less than or equal, Greater than, Greater than or equal, or Between.
Value: Any positive decimal value.
Second value (in case the operator Between is selected): Any positive decimal value.
Currency: Any currency configured in Administration → Common → Currencies.
Click "Save".
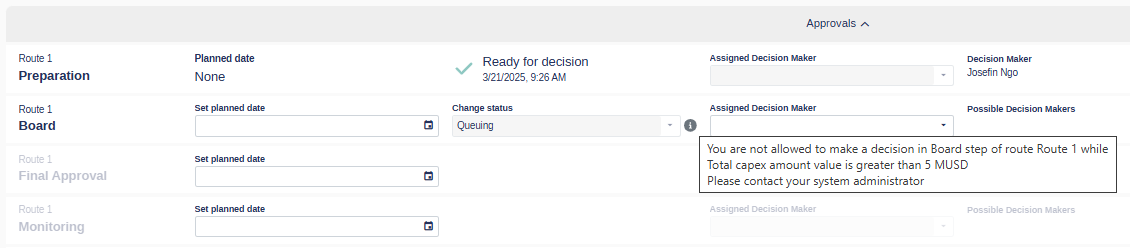
Route conditions in route steps
If a request does not meet the route conditions, the decision cannot move forward. In this case:
Change status: Disabled
Possible decision-makers list: Empty
Info message: Displays a description of the unmet criteria (shown on hover)