Assigning Permissions in the Organizational Structure
Node-Based Permissions in Weissr
Weissr uses a node-based permission system to provide fine-grained control and enhance security, ensuring that only authorized users can access or modify data. By assigning permissions to specific nodes—such as business areas, divisions, or production units—administrators can restrict access to information related to those nodes, allowing for better oversight and confidentiality. The hierarchical structure ensures that permissions are inherited from higher levels. A user with access to a Group/Division or higher-level node will automatically have access to all nodes and production units below that level. This makes permission management more efficient, as higher-level managers can oversee all activities in their branch of the organization, while employees at lower levels are restricted to their specific areas of responsibility.
Benefits of Node-Based Permissions
Improved Focus and Efficiency:
By limiting access to relevant nodes, users can focus solely on the tasks and data that are relevant to their role, avoiding distractions from unnecessary information. This leads to more efficient workflows, faster decision-making, and smoother collaboration across teams.Streamlined Access Control:
Administrators can assign users specific permissions to read, edit, or create data at the node level, giving them the exact level of access needed for their responsibilities without exposing irrelevant or sensitive information.
Types of Node-Based Permissions
Weissr offers different types of node-based permissions that control the level of access users have to requests and projects within specific nodes. Each permission type is designed to provide granular control, ensuring that users only have access to the data they need.
1. Project (CM) Permission
This permission allows users to read, edit, or create project-related data within a specific node. Depending on the level of access granted, users can:
Read: View all requests/projects within the node.
Edit: Modify requests/projects.
Create: Create new requests/projects.
Request owners will always have visibility into their own requests, even if they don’t have "Project (CM)" or "Request Creation" permissions for the node.)
2. Request Creation Permission
This permission allows users to create new requests within a specific node. However, users will only see the requests they personally created and will not have access to other requests under that node.
3. Approval Permission
Users with Approval Permission can participate in the approval process and are eligible to act as decision-makers for requests. However, this permission alone does not grant access to view all requests within the node. It only provides the ability to change the state of a request as part of the approval workflow.
Requirements for Approval
For a user to approve a request, they must meet the following conditions:
Approval Permission for the node.
Access to the request through one of the following:
Project (CM) Permission (at least Read access).
Request Creation Permission (as the owner of the request).
Being selected in a user property (e.g., project manager) with Read or Edit access.
Additionally, approval must be granted for the specific step in the route through:
User group approval permission, or
Individual user approval permission.
Keep in mind that some steps in the approval route may require specific properties to be filled, unrelated to permissions but essential for the process.
Assigning Permissions
In Weissr, node-based permissions can be assigned to individual users or user groups, offering flexibility in managing access. Properly assigning permissions ensures users have the necessary access to carry out their responsibilities while maintaining security and control over sensitive data.
1. Single Users
Permissions can be directly assigned to individual users based on their role in the organization. This method allows for tailored access control when specific individuals need unique permission settings.
2. User Groups (Recommended)
The most efficient and scalable way to manage access is by assigning permissions to user groups. This approach streamlines permission management, ensuring consistency across teams, and simplifies updates or onboarding by managing permissions for multiple users at once. Using user groups also reduces administrative overhead when adjusting permissions for large teams.
Step-by-Step Guide: How to Assign Node Permissions
Follow these steps to assign node permissions to either a single user or a user group:
Navigate to Administration
Go to Administration > Capex Management > Organizational Structure.Select the Node
In the organizational hierarchy, select the specific node (e.g., division, business area, production unit) where you want to assign permissions.Choose the Permission Type for either a user or a user group
Select the permission type (e.g., Project (CM), Request Creation, or Approval) from the available list.
If you are assigning Project (CM) permission, you must specify the access level (Read, Edit, or Create). Read access is selected by default.
Assign to User or User Group
Based on your selection in the previous step, choose whether to assign the permission to an individual user or a user group.
When using user groups, any permissions you set will automatically apply to all members of the group, making future updates easier.
Handling Multiple User Group Permissions
The highest permission level will be applied if a user belongs to multiple user groups that grant permissions to the same or overlapping nodes. This ensures that users receive the most appropriate access based on their group memberships.
Example Scenario:
User group: Scandinavia-Read
A user is part of a user group that has Read permission for all production units under the Scandinavia node. This means they can view requests in any production unit within Scandinavia.User group Stockholm-Create:
The same user is also part of another group that has Create permission specifically for the Stockholm production unit, which is located under the Scandinavia node. This permission allows them to create new requests in Stockholm.
Result:
The user will have Create access in the Stockholm production unit (due to the higher permission level from the Stockholm group).
For all other production units under the Scandinavia node, the user will retain Read access as granted by the Scandinavia group.
This approach ensures that users get the most permissive access where applicable while maintaining appropriate control elsewhere.
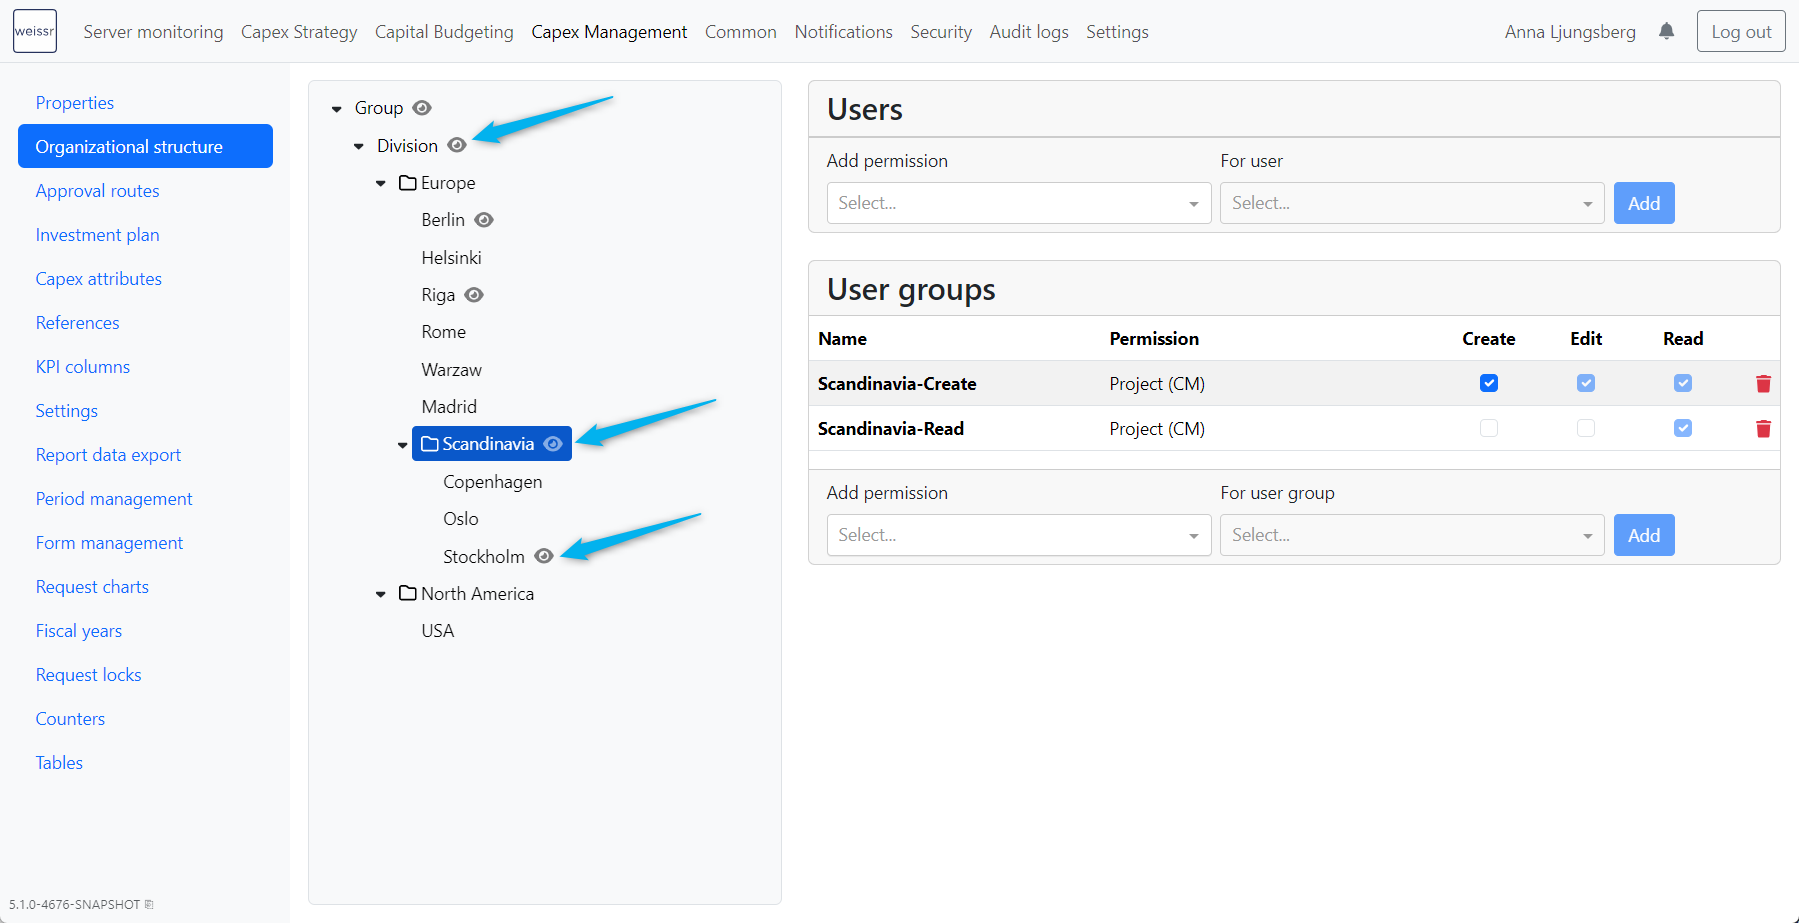
Viewing Node Permissions
In the organizational structure, nodes with assigned permissions will display an eye icon next to them. This icon indicates that permissions have been set for that node. To view the existing permissions:
Locate the Node
Navigate through the organizational structure and look for nodes marked with the eye icon.Click the Node
Click on the node to open its permissions details. Here, you can see the current users or user groups who have been granted access, as well as the specific permission types (e.g., Read, Edit, Create, Approval) that have been assigned.