Expenditure Management
The Expenditure Settings menu provides a centralized and structured way to manage all expenditure-related configurations. Here, Administrators can efficiently configure expenditure layouts, expenditure category groups, and payment terms (if utilizing accrual and cash-based reporting), and decide on depreciation calculation logic.
Layouts
Expenditure layouts define which fields are available and displayed in the expenditure grid when users enter or review capex and opex. Layout settings ensure that users see only the most relevant fields during different phases of the project lifecycle, making the grid easier to use and aligned with your organization's processes.
Layout settings include four key components:
Available properties — which fields can be used in the grid
Pre-decision layout — fields shown before a request is approved
Post-decision layout — fields shown after approval
Resolution settings — how many outlay years to display and at what resolution (monthly, quarterly, yearly)
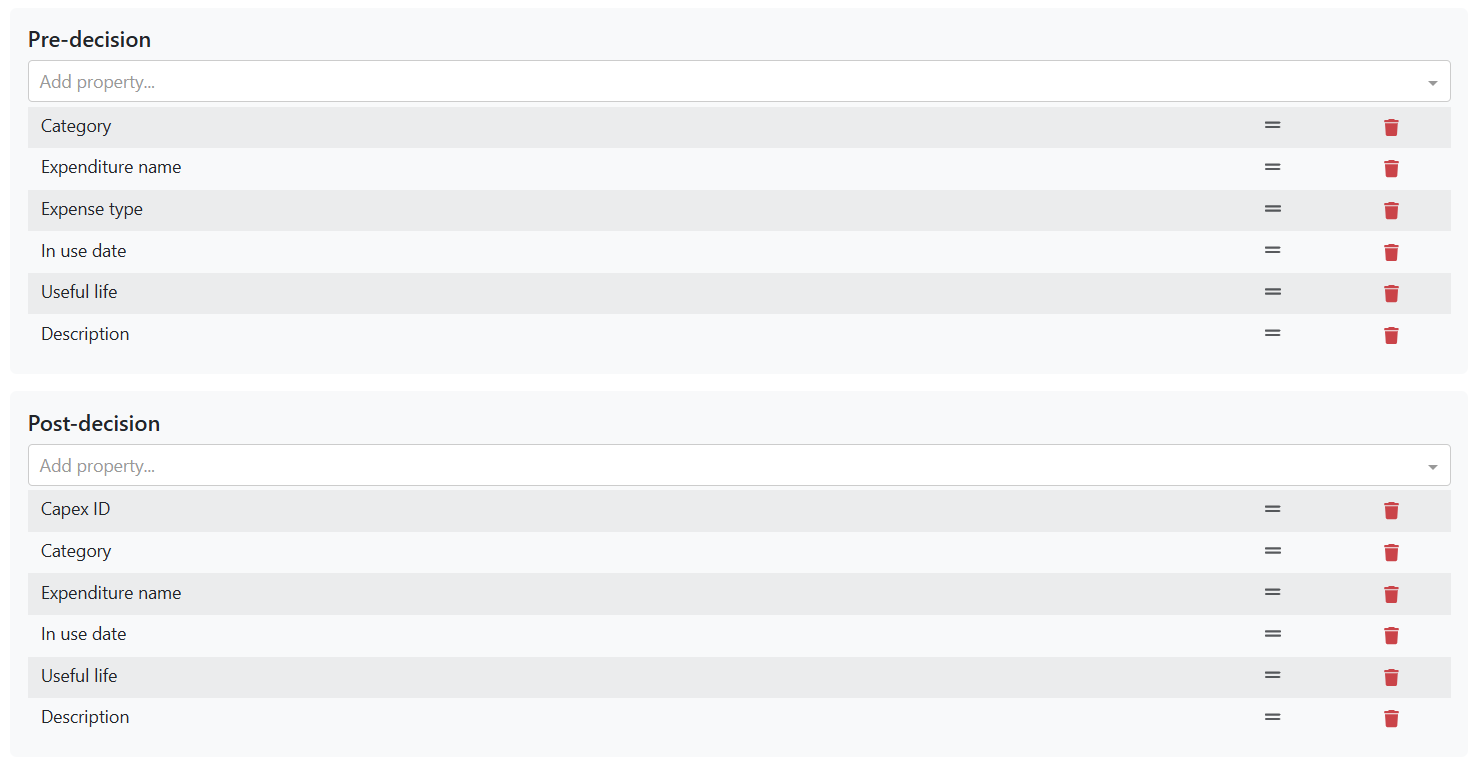
Available properties
This section shows the full list of global and expenditure properties that users can include in their view. It defines which fields are accessible for both the pre- and post-decision layouts.
To manage available properties:
Click the input field to open the full list of properties.
Use the scroll or search function to find and select the properties you want to include.
Click on a property to add or remove it from the available list.
💡 Tip: Some fields are required by Weissr to create expenditure line items (e.g., Category, Expense type). These fields should typically be included in the default layout for a smooth user experience. They can be excluded only if a default value is set. If a required field is missing from a user’s view, they will be prompted to add it before creating a new line item.

Pre-decision and post-decision layout
This section controls which fields are displayed, and in what order, during the pre-decision (before approval) and post-decision (after approval) phases.
Use the dropdown to add properties from the available list.
Click and drag fields to reorder them in the layout.
Use the trash icon to remove any fields that aren't needed.
📌 The list of selectable fields in each layout is limited to what’s defined in the Available properties section.
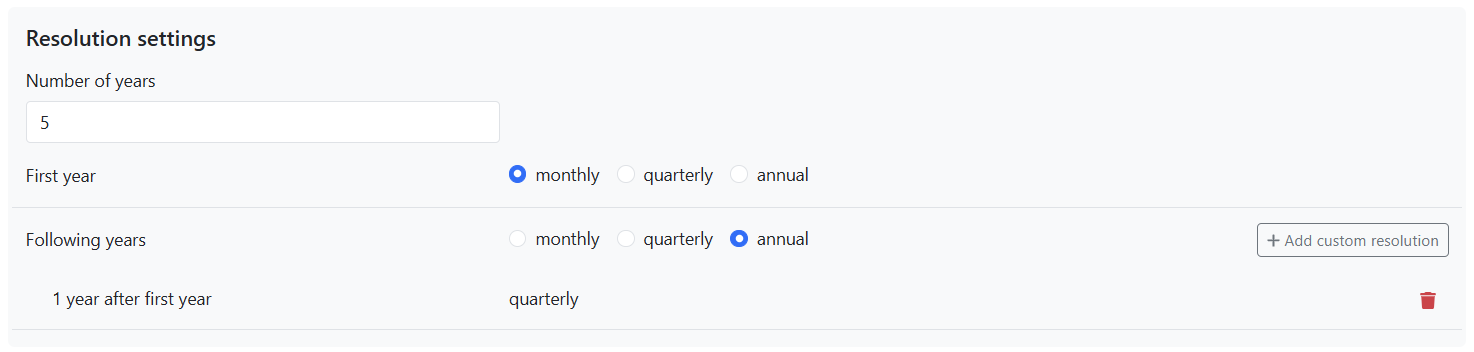
Resolution settings
This section defines how outlay data is displayed in the expenditure grid over time.
You can configure:
Number of years – Set the default number of outlay years to be displayed (e.g., 5 years).
First year resolution – Choose how detailed the first year should be: monthly, quarterly, or annually.
For the following years, apply a different resolution if needed.
Custom resolution – Use the Add custom resolution button to define unique resolutions for specific years related to the first year.
📌 These settings define the default view, but users can always adjust the number of visible outlay years and change resolution settings directly in the expenditure grid to suit their needs.
📌 The number of available years that users can choose from depends on the value of the Analysis period length (ID 78) property for the project.
Saving layout and resolution settings
After making changes to available properties, pre- or post-decision layouts, or resolution settings, administrators must click the blue Save button at the bottom of the page to apply the changes.
📌 Note:
Saving updates the default layout configuration, but it does not automatically override personal views that users have already customized in the expenditure grid.
Existing users will need to reset their grid layout (via the three-dot menu > Reset layout) to see the updated defaults.
New users, or those who haven’t customized their view, will automatically see the updated default layout when opening the grid.
Category groups
Category groups allow administrators to organize expenditure categories into reusable sets. These groups can be referenced later in calculations, filters, charts, and visualizations across the Weissr platform.
🔗 Learn more about managing expenditure categories →
🔗 Learn how category groups are used in the expenditure aggregation setting→
Purpose and usage
Category groups are designed to:
Simplify configuration management, especially when new categories are added
Enable flexible grouping of categories for reporting and visual analysis
Each category group can include one or more expenditure categories. Likewise, a single category can belong to multiple groups.
Category groups are used in:
Properties with expenditure aggregation rules
Request charts (if configured)
⚠️ Category groups are not available in the expenditure grid.
ℹ️ Using category groups is optional; categories can exist independently of any group.
Configuration
Navigate to: Administration → Expenditure management → Category Groups
From here, you can:
Create a new group by assigning it a unique name
Rename an existing group (name must remain unique)
Delete groups (only if no blocking dependencies exist)
Add or remove categories within a group
Payment terms
Admins can configure how payment terms (in days) are translated into monthly outlay resolutions in Weissr Capex. This setup ensures that entered payment terms align with financial planning and reporting needs.
Only available for organizations using the accrual and cash-focused outlay feature to report expenditures in both accrual and cash terms.
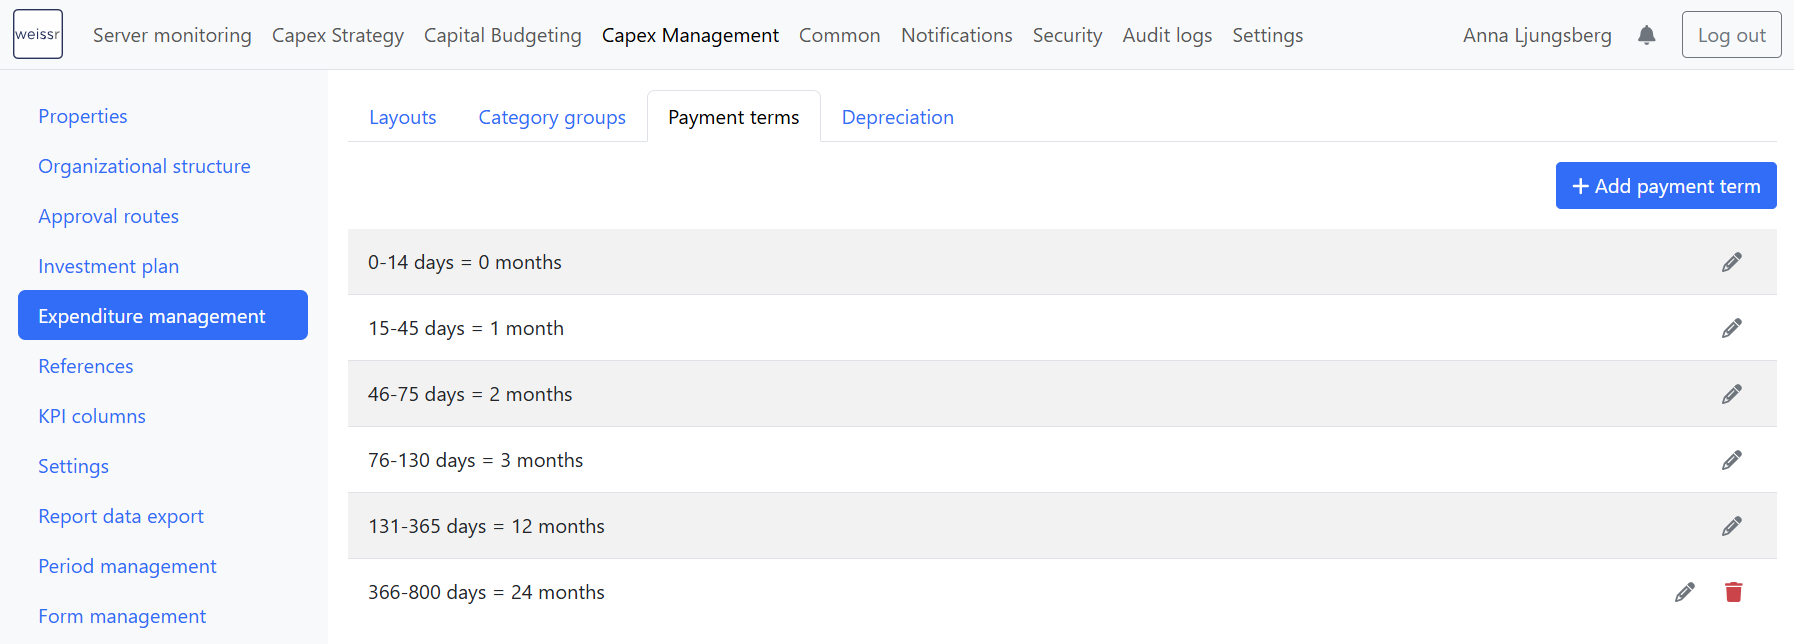
How payment terms translation works
Each payment term translation defines a range in days and maps it to a monthly resolution (as a number of months). These definitions are used to determine how far into the future a payment is expected, affecting the cash flow projection.
Behavior and rules
You can define any number of payment term ranges.
The first definition must always start at day 0.
Ranges must be continuous—no gaps are allowed. Each new range starts where the previous one ended +1.
The start number of each range is automatically set and cannot be edited.
The end number of the range is editable (default is start + 356 days).
Only the last defined range can be deleted.
For each range, you define the month resolution (e.g., 0, 1, 2, 3, etc.).
If payment terms are updated, Weissr will not automatically recalculate cash outlays.
To apply the new payment terms, you must manually trigger recalculation from the expenditure grid.
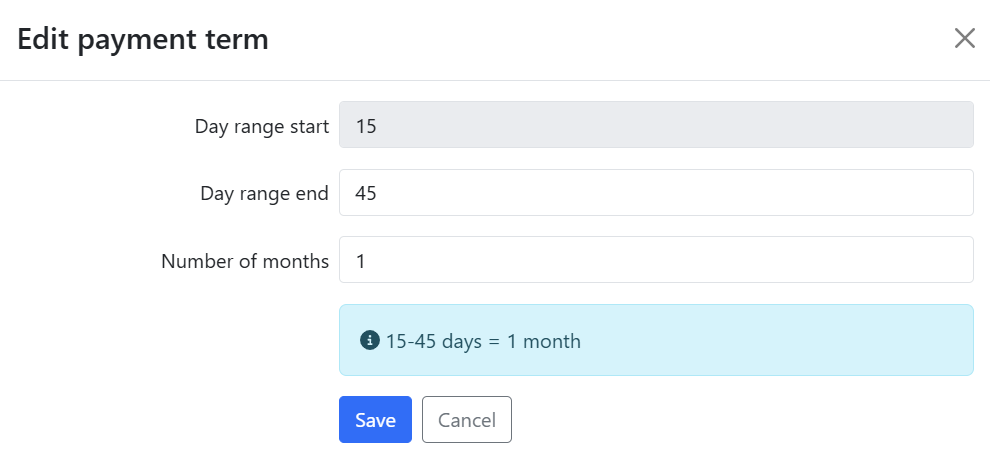
Adding a new payment term translation
Navigate to: Administration → Capex Management → Expenditure Management → Payment Terms
Click + Add range.
The start day will be pre-filled based on the previous range.
Enter the end day (max value will be suggested).
Enter the translation in months for this range.
Save.
Use logical month resolutions that reflect how your business handles payment scheduling. For example, short-term payments (0–30 days) might map to 0 or 1 month, while longer terms (180+ days) can map to 6–24 months.
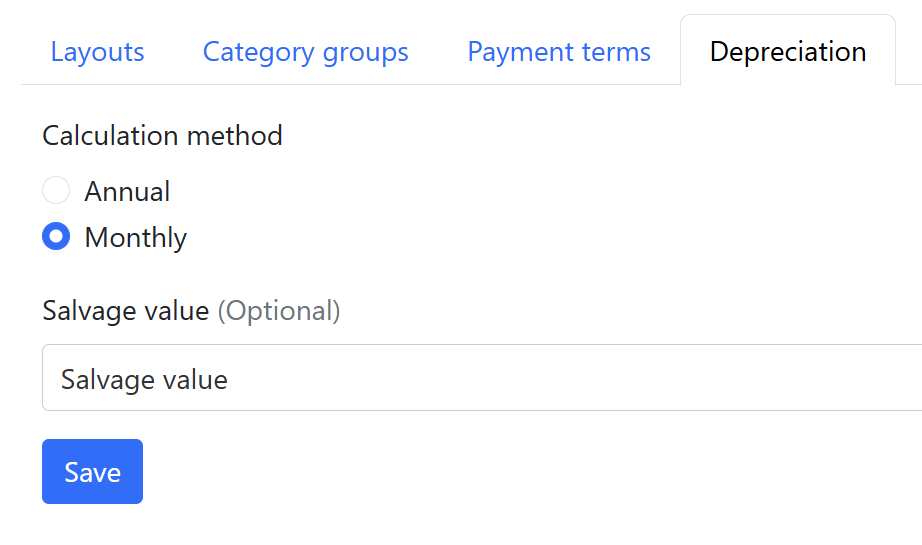
Depreciation
Weissr Capex Management uses the straight-line depreciation method and supports calculations on either a yearly or monthly basis.
Configuration options
In the Depreciation settings tab, you can define:
The calculation method: Yearly or Monthly
Whether to include salvage value in the calculation
Depreciation is calculated for each line item in the expenditure grid and is based on:
Investment cost
Useful life (integer from 0 to 200)
In-use date
Salvage value (optional)
If Useful life = 0, the item is excluded from depreciation.
Where depreciation is used
Depreciation is only used in the investment models if there is a data row with the code
SYS_DEPRECIATION.The depreciation amount can also be used to calculate the tax shield from depreciation in the investment model if a data row uses the code
SYS_TAX_SHLD.
Salvage value setup
Only editable money-type expenditure properties can be selected as the salvage value field.
If selected, users must enter a salvage value per line in the expenditure grid for it to apply.
Changing the calculation method
Switching between yearly and monthly depreciation will automatically recalculate all model values to reflect the updated method.