SSO Configuration
The SSO configuration page lets you connect your organization's OpenID Connect (OIDC) identity provider to Weissr directly in the application, without involving a Weissr technician and without a server restart. It is managed in Administration → Security → SSO configuration and applies to the whole environment. This guide is for superusers and administrators who own identity and access management for their Weissr environment.
Before you start
You need the following in place before configuring a provider:
The OAuth profile must be enabled on your Weissr environment. This is a server-side setting, so contact Weissr support if you are unsure whether it is active.
The Administrator global permission, which grants access to the Administration page.
Rights in your identity provider to create an application registration and read its client ID, client secret, and issuer URI.
📌 Note: If the OAuth profile is not enabled, configuration entered in the UI will not take effect, even after saving.
How SSO configuration works
Each identity provider you connect is stored as a provider with its own Registration ID. Providers appear on the login page as sign-in buttons, and users who authenticate through them are handled as external users whose credentials are managed in your identity provider rather than in Weissr.
Two behaviors are worth knowing up front:
UI configuration takes precedence over file configuration for the same Registration ID. Existing file-based setups keep working, and anything you enter in the UI for a matching Registration ID overrides it.
Changes apply without a server restart. This includes replacing a client secret, so you can rotate credentials on your own schedule.
💡 Info: File-based configuration is still supported for environments that were set up that way.
Adding an SSO provider
Go to Administration → Security → SSO configuration.
Click + Add provider. If no providers exist yet, the page shows a "No provider configured" message.
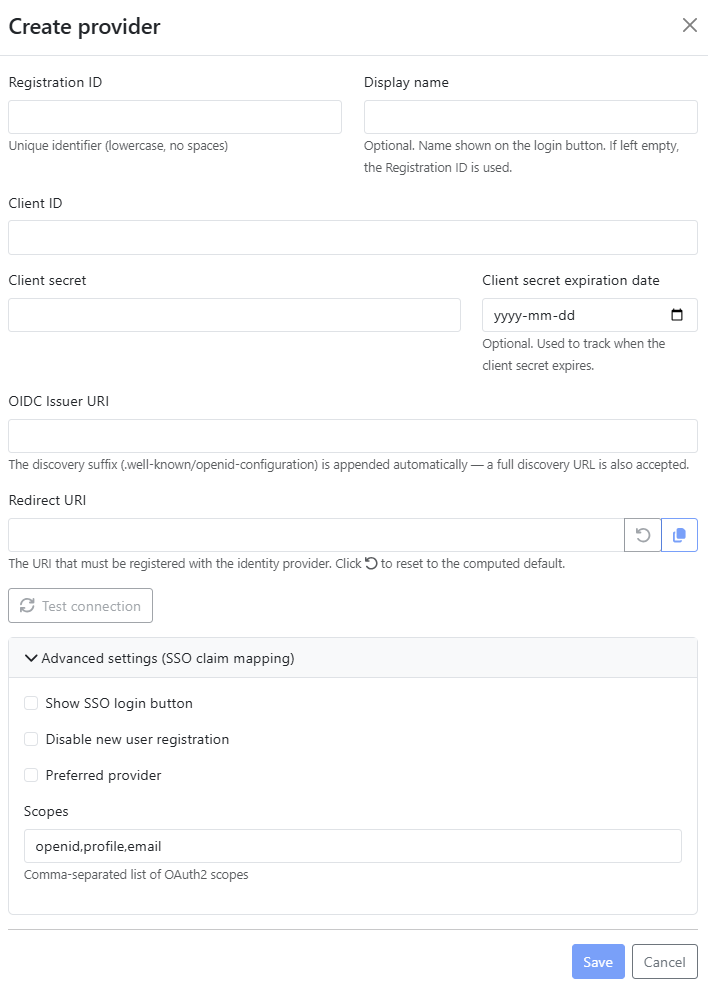
Fill in the provider details described in the field reference below.
Copy the Redirect URI and register it in your identity provider's application registration. Use the copy icon next to the field.
Expand Advanced settings (SSO claim mapping) and set the scopes and login behavior for this provider.
Click Test connection to verify the details before committing them.
Click Save.
Field reference
Field | Required | What it does |
|---|---|---|
Registration ID | Yes | Unique identifier for the provider, lowercase and without spaces. Also the key used to match and override an existing file-based configuration. |
Display name | No | The name shown on the login button. If left empty, the Registration ID is used instead. |
Client ID | Yes | The client ID from your identity provider's application registration. |
Client secret | Yes | The client secret from your identity provider. Can be replaced later without a restart. |
Client secret expiration date | No | For your own tracking of when the secret expires. It does not affect authentication. |
OIDC Issuer URI | Yes | Your provider's issuer URI. The discovery suffix (.well-known/openid-configuration) is appended automatically, and a full discovery URL is also accepted. |
Redirect URI | Yes | The URI that must be registered with your identity provider. Weissr computes a default; use the reset icon to return to it after an edit. |
💡 Tip: The Issuer URI must point at the full OIDC issuer path, not just your provider's domain. For OneLogin, for example, this means https://yourcompany.onelogin.com/oidc/2 rather than https://yourcompany.onelogin.com. A domain-only value will fail the connection test.
Advanced settings (SSO claim mapping)
Expand Advanced settings (SSO claim mapping) in the provider dialog to control the scopes requested from your identity provider and how the provider behaves on the login page.
Setting | Default on a new provider | What it does |
|---|---|---|
Show SSO login button | Cleared | Controls whether this provider's button appears on the Weissr login page. Leave it cleared while you set the provider up, then select it when you are ready to open SSO to users. |
Disable new user registration | Cleared | When cleared, a user who authenticates through this provider for the first time is created in Weissr automatically. Select it to allow only users who already exist in Weissr to sign in. |
Preferred provider | Cleared | Marks this provider as the preferred sign-in route on the login page. |
Scopes | openid,profile,email | Comma-separated list of OAuth2 scopes requested from the identity provider. |
💡 Tip: If you rely on group membership from your identity provider to control access in Weissr, add "groups" to the scopes list. Without it the token carries no group claim, and users will authenticate successfully but end up with no permissions.
Testing the connection
Test connection validates the details you entered against your identity provider before you save.
Errors are expanded automatically so you can see what failed.
Save is blocked while a mandatory field is empty or a URI is not in a valid format.
Test connection does not verify all SSO paramters, it only checks validity of Issuer URI and information retrieved from Identity Provider. SSO still can fail during the user login because of malformed token, redirect URI, or permissions on Entra ID side.
Managing providers after setup
The SSO configuration page lists every configured provider so you can maintain them over time.
Showing or hiding a provider on the login page
Login button visibility is controlled by Show SSO login button under Advanced settings in the provider dialog. Clear the checkbox to take a provider out of use without deleting its configuration, for example while you troubleshoot or migrate between identity providers.
💡 User impact: Clearing Show SSO login button removes the provider's button from the login page. Users who sign in through it will no longer be able to authenticate, so make sure an alternative route into the environment exists first.
Rotating a client secret
Go to Administration → Security → SSO configuration and open the provider.
Replace the value in Client secret.
Optionally update Client secret expiration date to the new expiry.
Click Test connection, then Save.
The new secret takes effect immediately. No server restart and no Weissr involvement are needed.
💡 Tip: Fill in the expiration date when you create or rotate a secret. It gives you a record of when the next rotation is due, which is the most common cause of an SSO outage. When secret expiration date approaches and there is 10 days left, the server health monitoring will turn to “down” state and server health alert will be activated on monitoring board.
Deleting a provider
Deleting a provider removes its configuration and its login button.
⚠️ Warning: Deleting a provider is not reversible. Users who authenticate through it lose access at once, and you will need the client ID, client secret, and issuer URI again to recreate it. Clear Show SSO login button instead if you only need to pause the provider.
SCIM user provisioning New in 5.3.5
SCIM (System for Cross-domain Identity Management) lets your identity provider create, update, and deactivate Weissr users automatically, so user administration happens in your directory rather than in two places. From 5.3.5 you attach SCIM to a provider yourself from this page, rather than through a manual server-side setup handled by a Weissr technician.
SCIM is provisioning, not authentication. It keeps user records in step with your directory; the provider it is attached to is what lets those users sign in. Most environments want both.
Before you configure SCIM
An SSO provider already configured on this page. SCIM attaches to one provider, so the provider has to exist first.
The auth_server profile enabled on your Weissr environment, because the SCIM API user authenticates through it. This is a server-side setting, so contact Weissr support if you are unsure whether it is active.
SCIM enabled in the application configuration, that is achieved by adding scim profile:
weissr:
  integration:
    scim:
      enabled: true
The Administrator global permission, which grants access to the Administration page.
📌 Note: Until SCIM is enabled in the application configuration, the SCIM column and the Edit SCIM action do not appear on the provider list. Enabling it is a server-side change; everything after that you do yourself.
Finding the SCIM settings for a provider
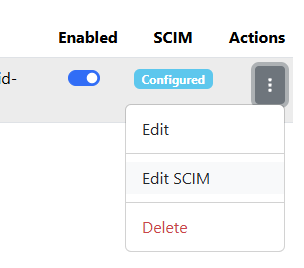
Each provider in the list has a SCIM column and an Actions menu.
Go to Administration → Security → SSO configuration.
Find the provider in the list. The SCIM column shows Configured when SCIM is already attached to that provider, and is empty when it is not.
Open the Actions menu at the end of the row and choose Edit SCIM.
Configuring SCIM for a provider
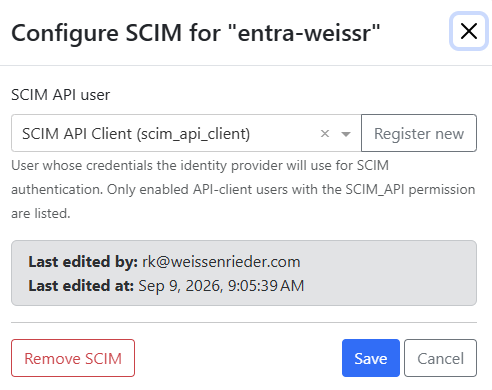
Edit SCIM opens a Configure SCIM for "[registration id]" dialog, so it is always clear which provider you are attaching SCIM to.
Field | What it does |
|---|---|
SCIM API user | The user whose credentials your identity provider uses to authenticate its SCIM calls. Only enabled API-client users holding the |
Register new | Creates a new API-client user for SCIM, with the |
The dialog also records Last edited by and Last edited at, so you can see who last changed the SCIM setup and when.
Select an existing user in SCIM API user, or click Register new to have Weissr create one.
Click Save.
In your identity provider, point provisioning at your Weissr environment and authenticate as the SCIM API user you selected.
📌 Note: If the dropdown is empty, there is no enabled API-client user with the
SCIM_APIpermission in this environment. Use Register new rather than hunting for an existing user to reuse.
💡 Tip: Keep one SCIM API user per identity provider rather than sharing one across providers. The Last edited record stays meaningful, and you can revoke one provider's access without affecting the others.
Detaching SCIM from a provider
Remove SCIM in the dialog detaches SCIM from the provider and clears the Configured state in the list. The provider itself, and the users SCIM has already created, are left alone.
⚠️ Warning: Once SCIM is removed, your identity provider can no longer provision into Weissr. Joiners are not created and leavers are not deactivated, so your directory drifts out of step with Weissr until SCIM is reattached or you take over user administration by hand.
Post-upgrade action for existing SCIM setups
⚠️ Important: post-upgrade action required for environments already using SCIM
5.3.5 introduces the
SCIM_APIpermission, and SCIM users must hold it to call the SCIM API. This applies to setups configured before 5.3.5, where the SCIM user was created without it.After upgrading, grant
SCIM_APIto the existing SCIM user in every environment that uses SCIM. Provisioning fails until you do, which means new joiners are not created and leavers are not deactivated, usually with no visible error inside Weissr. A user without the permission also does not appear in the SCIM API user list, so it can look as though no SCIM user exists.
The Customer Success team holds the list of customers running SCIM today.
Previous SCIM integrations are based on long living Bearer token. Token was produced by Weissr technicians and expires in about 1 year. Now Entra ID supports “OAuth2 client credentials grant” which provides automatic token refresh and has no expiration. IT is recommended to move existing customers to that kind of authentication, it is safer and requires less attention (no expiration).
Giving SSO users access to Weissr
Configuring a provider lets users authenticate. It does not by itself grant them any permissions in Weissr. Access comes from user groups, so assign the relevant user groups for the users who sign in through the provider.
If group mapping is missing, a user can authenticate successfully and still land on an empty screen with a message that they are not authorized. That symptom points at group assignment or a missing groups scope, not at the provider details themselves.
👉 Learn more about users and user groups
Troubleshooting
Symptom | Likely cause | What to do |
|---|---|---|
No login button on the login page | Show SSO login button is cleared, or configuration was saved without the OAuth profile enabled | Select the checkbox in Advanced settings, then confirm the OAuth profile is active with Weissr support |
Test connection fails on the Issuer URI | The URI is missing its issuer path segment | Enter the full issuer path, for example https://yourcompany.onelogin.com/oidc/2 |
Test connection fails on credentials | Client ID or client secret does not match the identity provider | Re-copy both values from the application registration and test again |
User authenticates but sees an empty screen and an authorization message | No group claim is being sent, or the user's groups are not mapped to Weissr user groups | Add groups to the scopes list, then check the user group assignment. If your provider sends group IDs rather than names, the group ID must be recorded on the Weissr user group |
Sign-in redirects fail after saving | The Redirect URI in Weissr is not registered in the identity provider | Copy the Redirect URI from the provider dialog and add it to the application registration |
A new user is not created on first login | Disable new user registration is selected for this provider | Clear the checkbox, or create the user in Weissr first |
No SCIM column or Edit SCIM action on the provider list | SCIM is not enabled in the application configuration, or the auth_server profile is inactive | Ask Weissr support to confirm SCIM is enabled in the configuration and that the auth_server profile is active |
The SCIM API user dropdown is empty | No enabled API-client user in this environment holds the | Click Register new in the dialog, or grant |
Provisioning stopped working after upgrading to 5.3.5 | The existing SCIM user does not hold the new | Grant |
Users are provisioned but cannot sign in | SCIM keeps user records in step; it does not grant permissions | Check the user's group assignment and that the provider is configured and visible on the login page |
Migrating from file-based configuration
If your environment was set up through the configuration file, you can move to UI-based management without downtime:
Note the registrationId used in the existing yml configuration.
Create a provider in the UI with the same value in Registration ID.
Enter the same client ID, client secret, issuer URI, and scopes, then test and save.
The UI configuration overrides the file configuration for that Registration ID from then on, which means later credential changes no longer require a technician or a restart.
📌 Note: The file configuration is not deleted by this process. It stays in place as the fallback if the UI configuration for that Registration ID is removed.